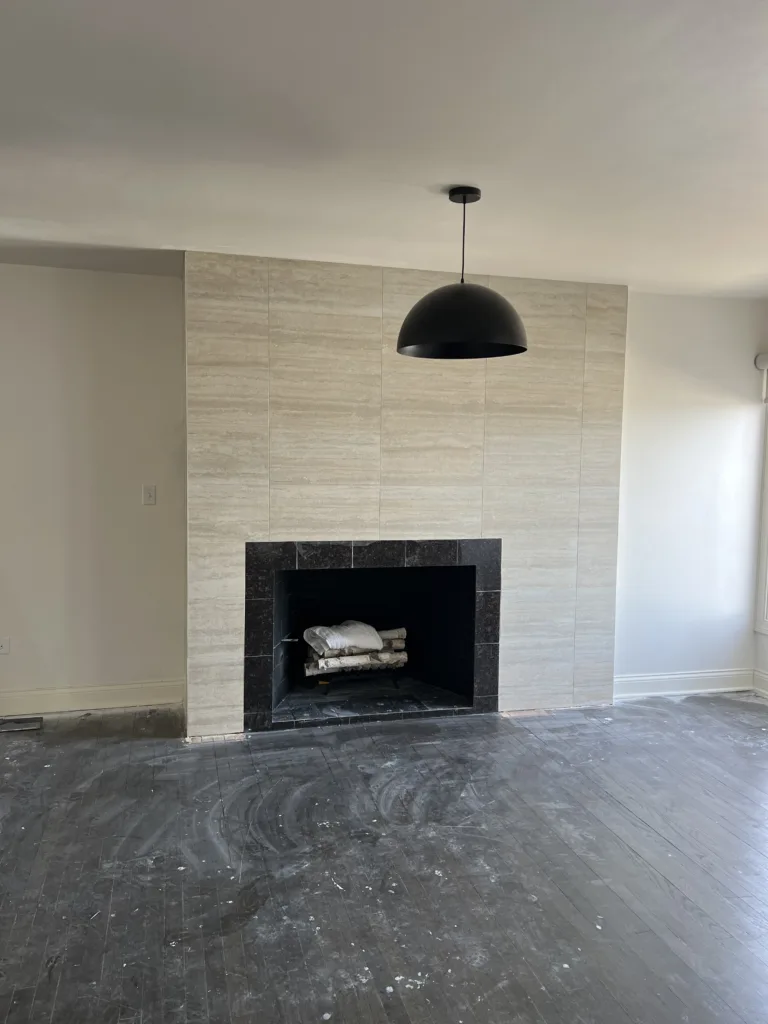
This completed fireplace remodel in Chicago transformed an older traditional fireplace into a cleaner, more modern full-height tile feature wall. The original fireplace had a large decorative mantel and an older brick surround. The goal was to remove the outdated look, prepare the wall properly, and install large-format tile around the fireplace to create a more modern focal point for the living room.
The project focused on the visible fireplace surround and wall finish. This was not a chimney repair, gas fireplace service, or firebox replacement. The work was a fireplace refacing and tile installation project: removing the old decorative elements, preparing the wall and substrate, planning the tile layout, installing large-format tile, aligning the grout joints, and finishing the surround so the fireplace looked clean, flat, and intentional.
A fireplace is usually one of the most visible elements in a living room. When the surround looks outdated, heavy, or mismatched with the rest of the space, it can make the whole room feel older. A tile fireplace remodel can update the room without rebuilding the entire wall or changing the full layout of the home.
Project Overview: Fireplace Remodel and Tile Installation
This fireplace remodeling project included removing the old mantel, exposing the existing brick fireplace surround, preparing the wall surface, installing a flat substrate, laying out the large-format tiles, setting the tile with proper spacing, using leveling clips for alignment, and completing the finish work around the fireplace opening.
The final design used large-format beige stone-look tile from the floor area up toward the ceiling. The existing dark tile around the firebox was kept as a contrasting frame, while the new lighter tile created a cleaner, taller, and more modern fireplace wall.
- Old decorative fireplace mantel removal
- Existing brick fireplace surface inspection
- Wall and fireplace surround preparation
- Substrate installation and surface flattening
- Large-format tile layout planning
- Tile cuts and dry layout before installation
- Large-format tile installation above and around the fireplace
- Laser layout lines for straight alignment
- Tile leveling clips and spacers for consistent joints
- Final grout, cleanup, and finished fireplace presentation
Before the Remodel: Outdated Mantel and Fireplace Wall
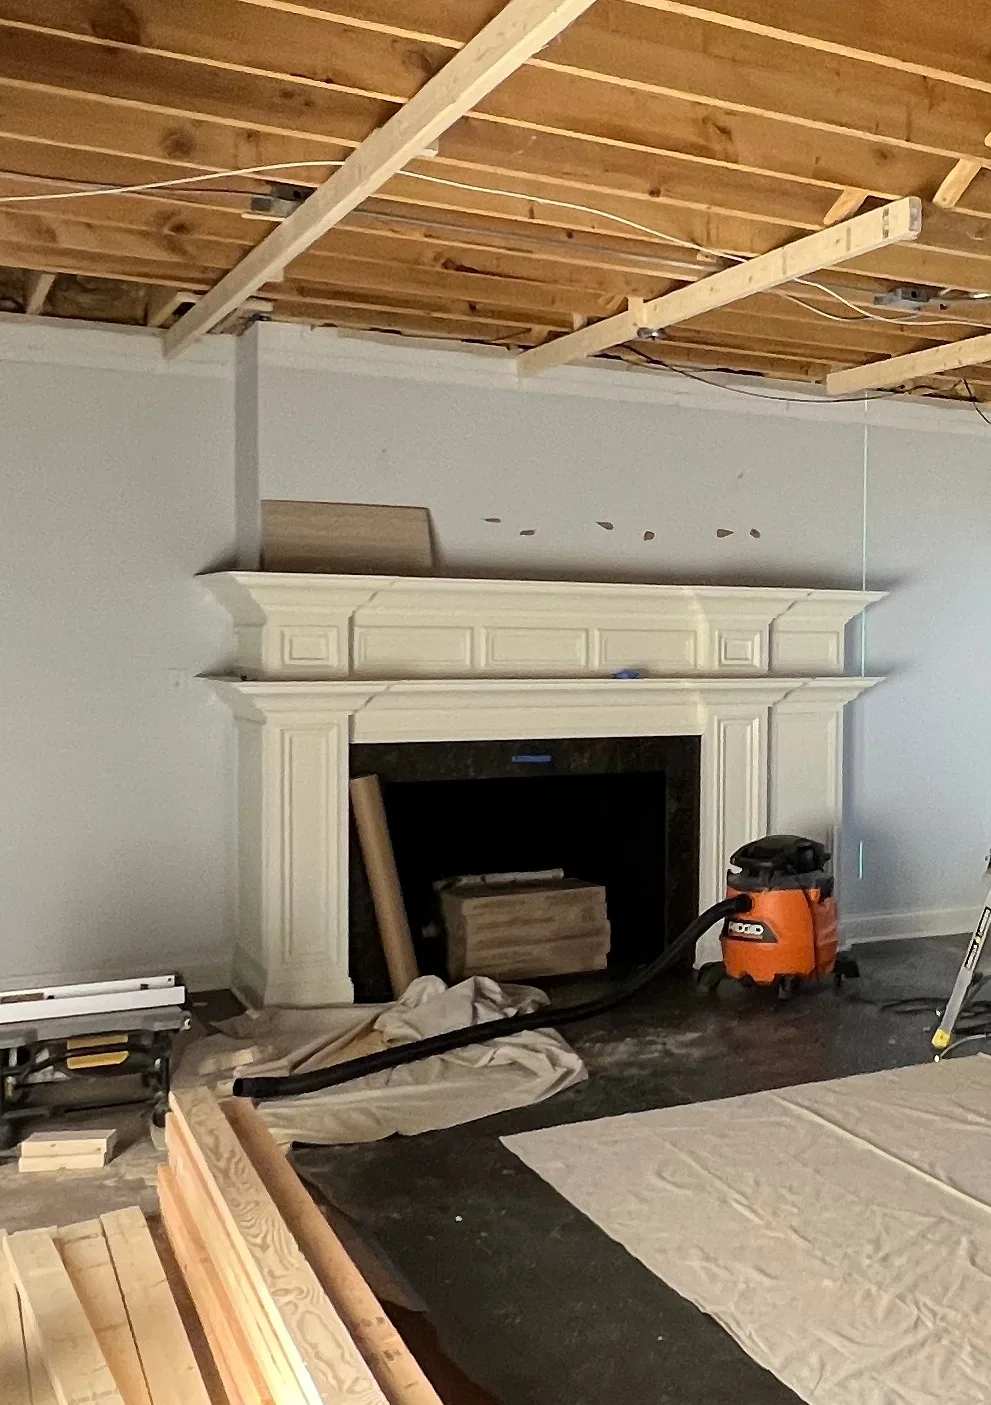
Before the remodel, the fireplace had a traditional white mantel with heavy trim details. The mantel itself was decorative, but it did not match the cleaner modern direction planned for the room. Above the fireplace, the wall also had old marks and unfinished areas from previous fixtures or wall-mounted items.
The ceiling was open during this stage, and the room was already in construction mode. This made it a good time to update the fireplace wall because the space was accessible, the floor could be protected, and the old mantel could be removed before final room finishes were completed.
The goal was to simplify the fireplace visually. Instead of a bulky mantel and mixed wall surfaces, the new design would create one clean tile plane around the fireplace. That kind of update works well in living rooms where the fireplace needs to feel like a modern architectural feature instead of a separate old decorative piece.
Step 1: Removing the Old Fireplace Mantel
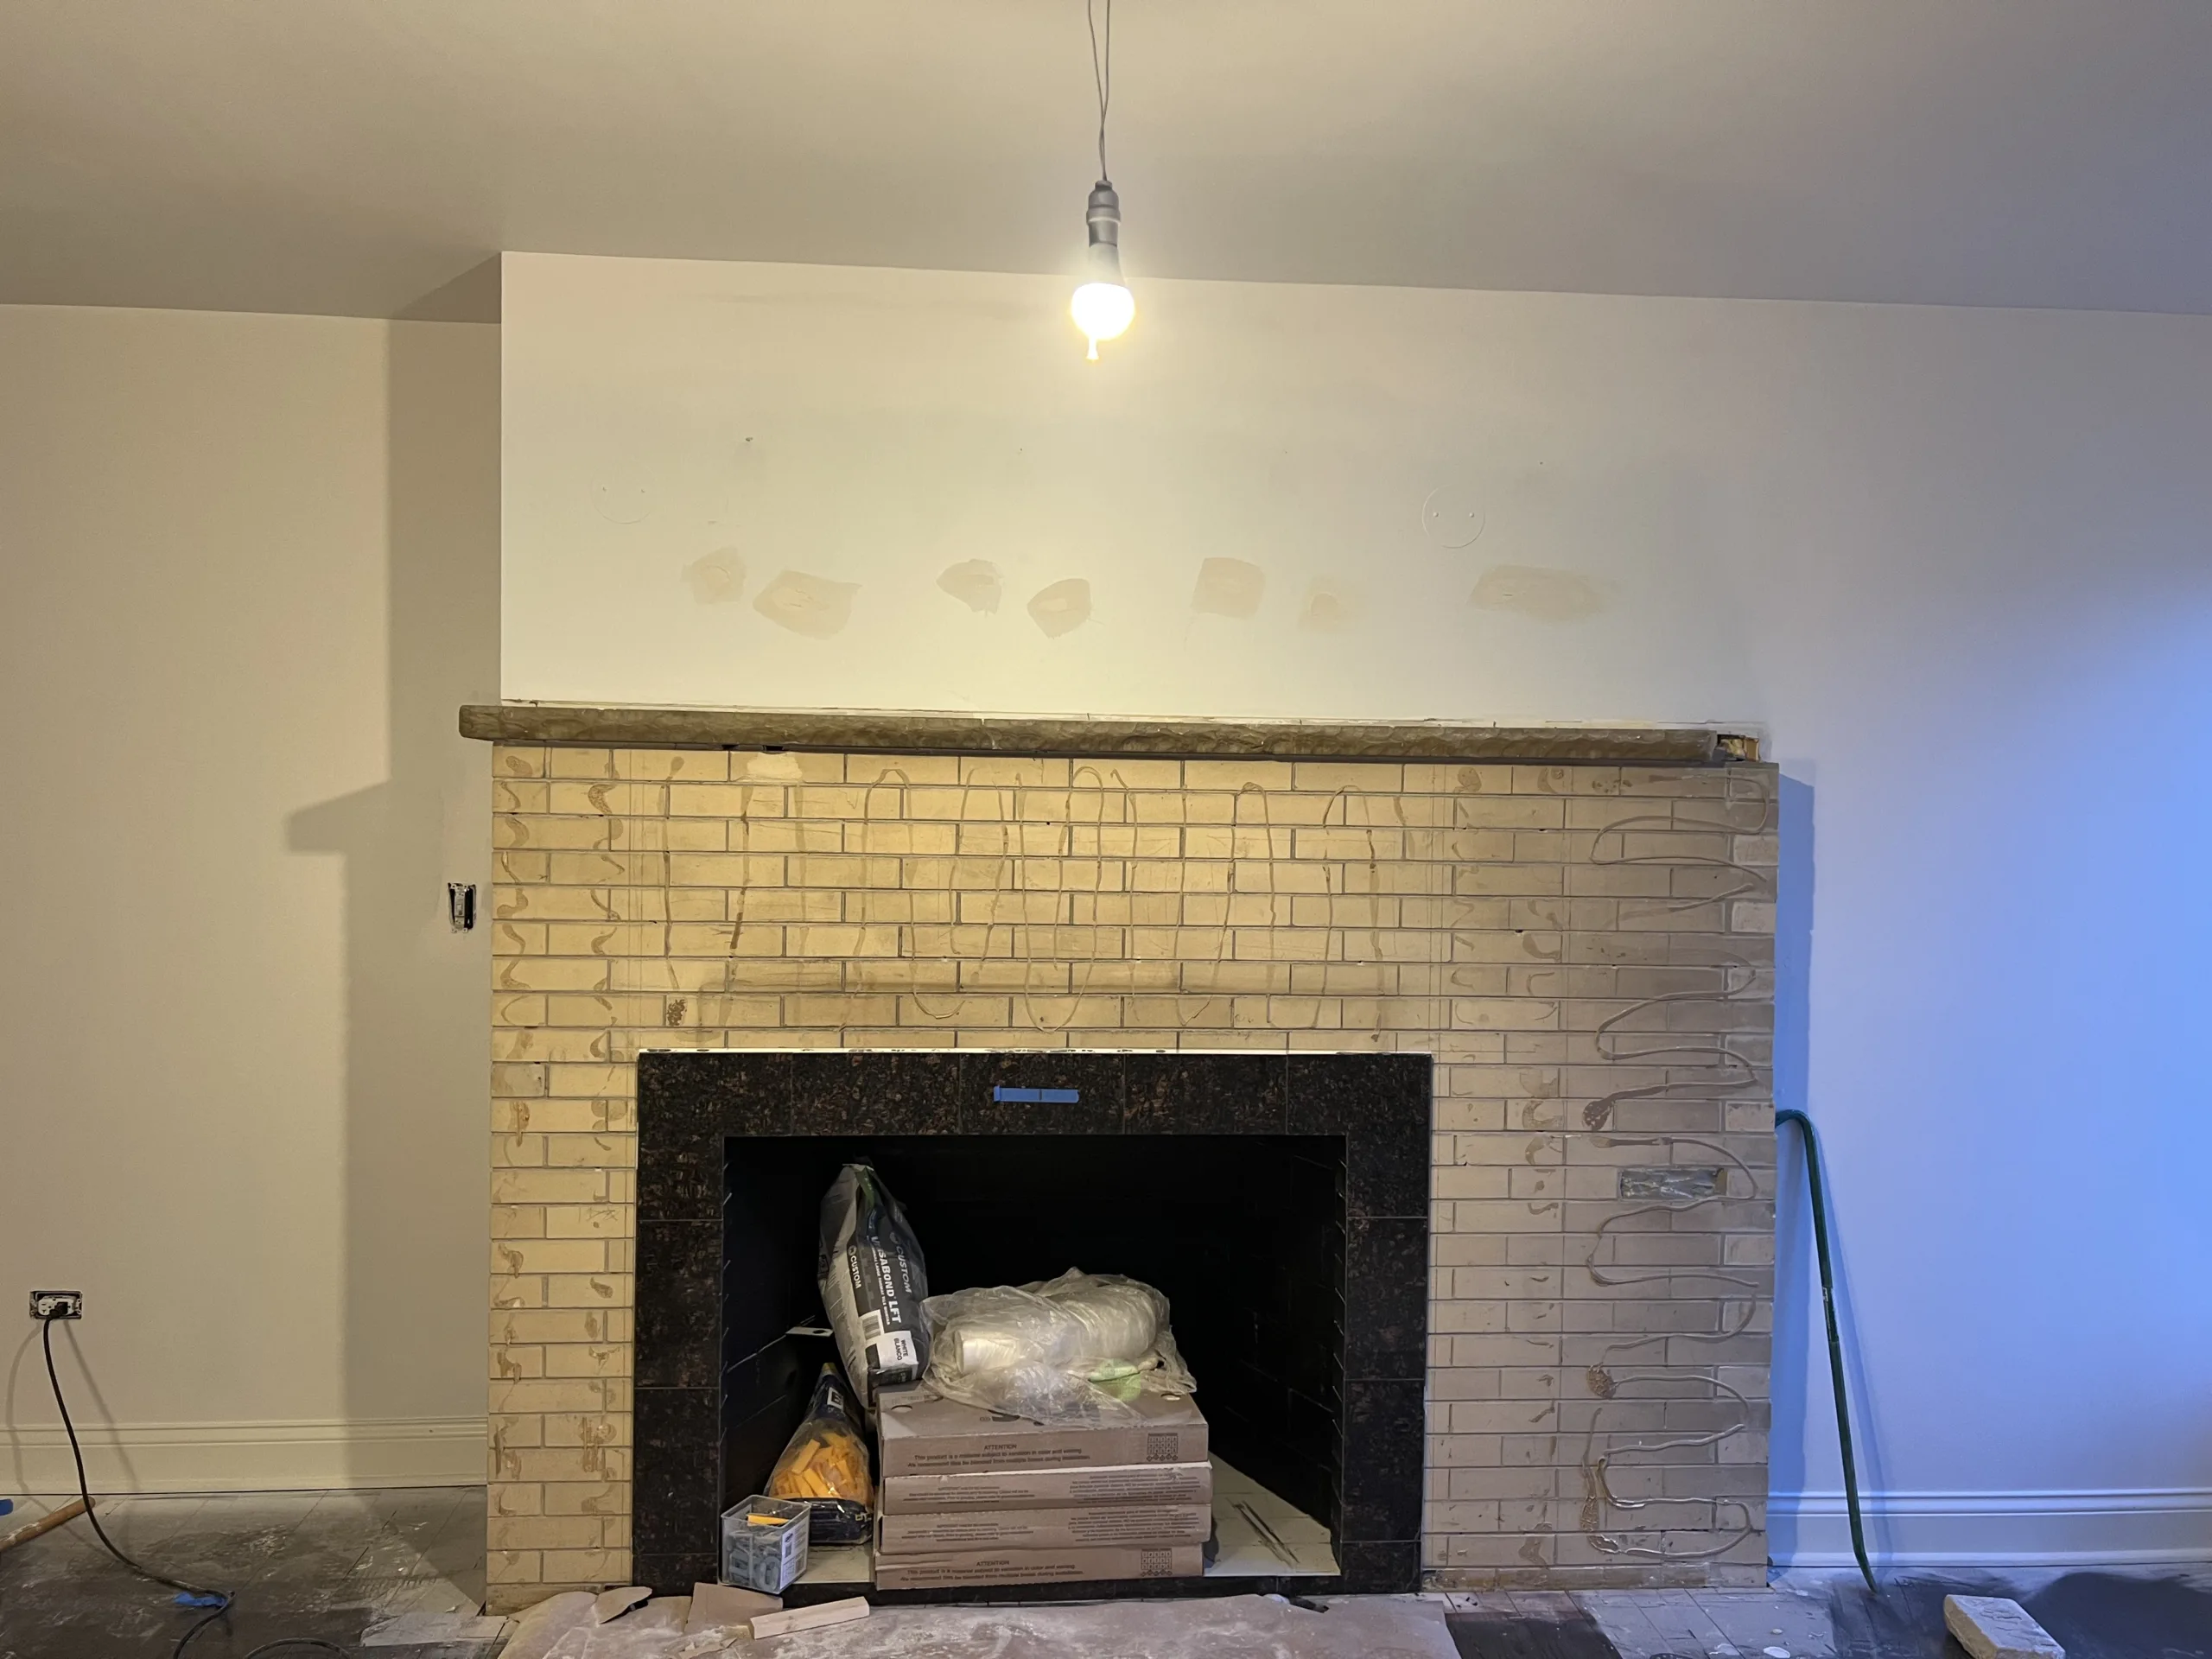
The first major step was removing the old mantel and exposing the original fireplace structure. Once the decorative trim was removed, the brick surround became visible. This stage is important because a fireplace remodel cannot be done correctly by simply covering everything without checking the existing surface.
The exposed brick showed adhesive marks, old attachment points, uneven areas, and transition points around the firebox. These are normal issues after removing an older mantel or surround. The surface needed to be cleaned, checked, and prepared before new tile could be installed.
Removing the old mantel also helped define the new shape of the fireplace wall. Instead of building another decorative frame, the plan was to create a full-height tiled feature that would make the fireplace look taller and more integrated with the room.
Step 2: Preparing the Fireplace Wall for Tile
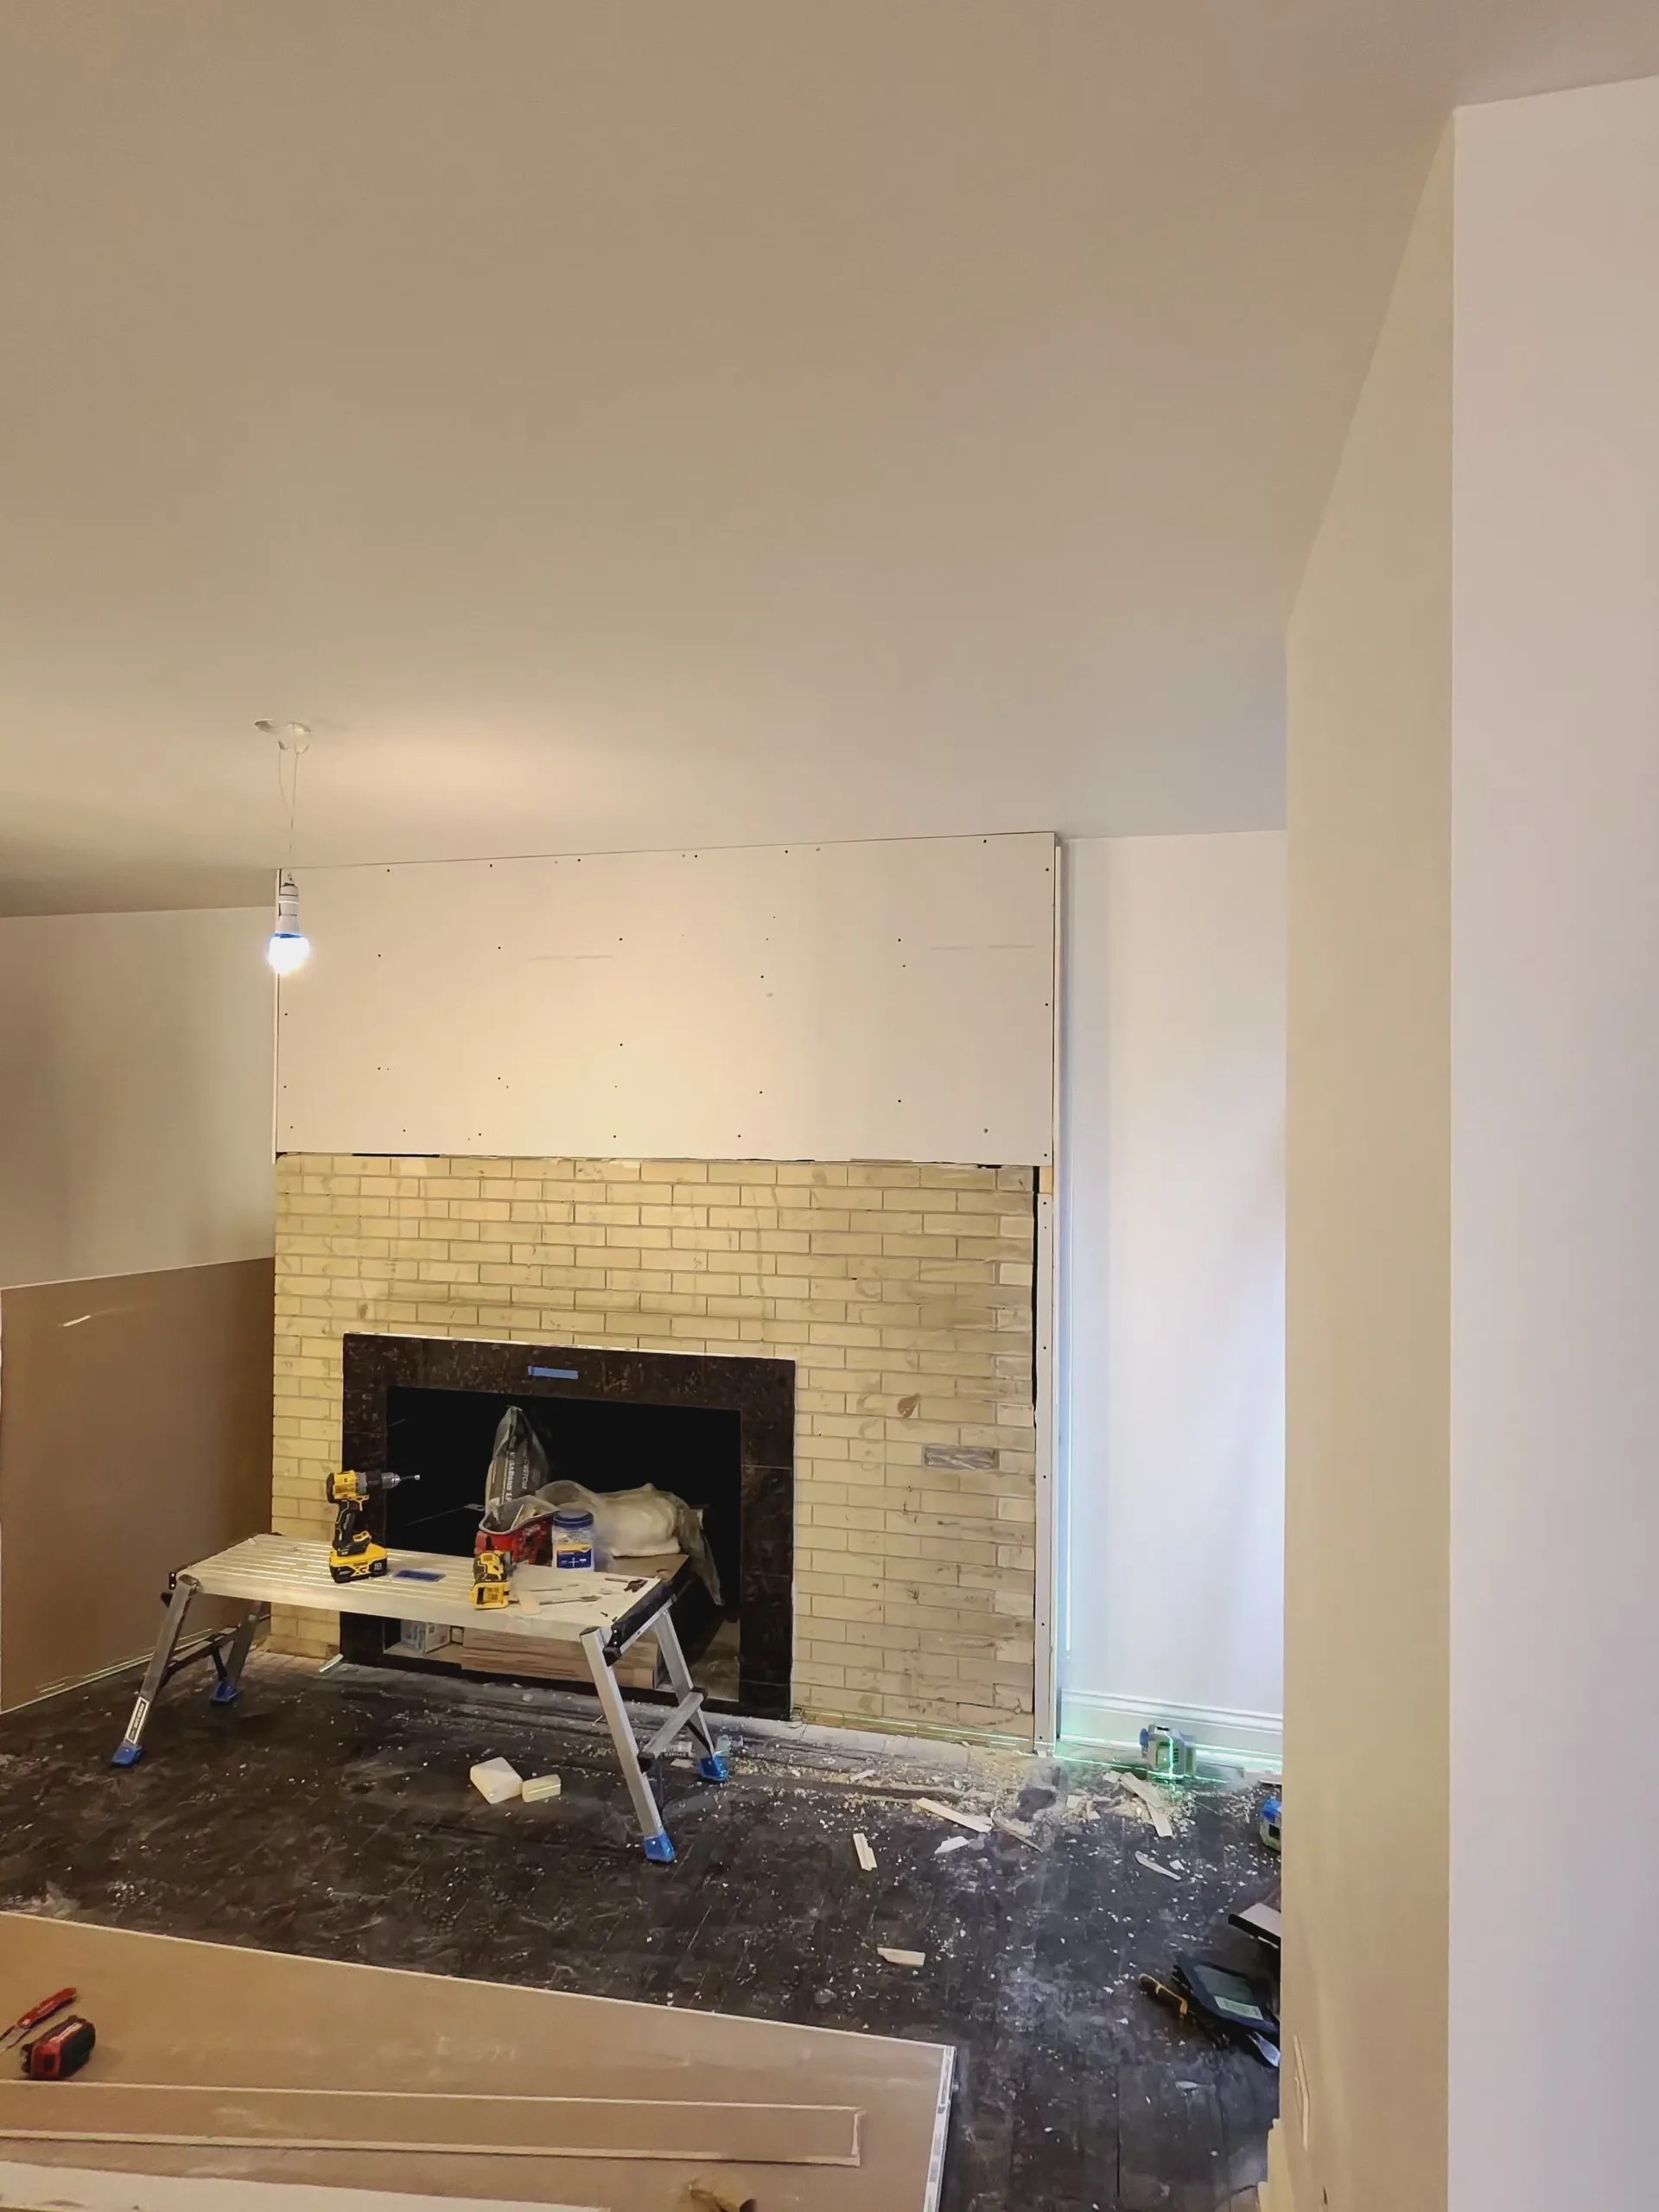
After demolition, the wall needed a proper tile-ready surface. Large-format tile requires a flatter and more stable substrate than small decorative tile because each piece covers a larger area. If the wall is uneven, the tile can show lippage, poor alignment, or inconsistent grout lines.
The upper fireplace wall was covered with a flat substrate so the tile would have a better base. The edges and side transitions were also prepared so the tile could wrap the fireplace wall cleanly. This stage included checking the vertical plane, preparing the surface, and creating a base that could support the large-format tile installation.
Surface preparation is one of the most important parts of any fireplace tile installation. The finished tile only looks as good as the surface behind it. If the substrate is not flat, secured, and properly prepared, the final fireplace wall can look uneven even if the tile itself is high quality.
Step 3: Planning the Large-Format Tile Layout
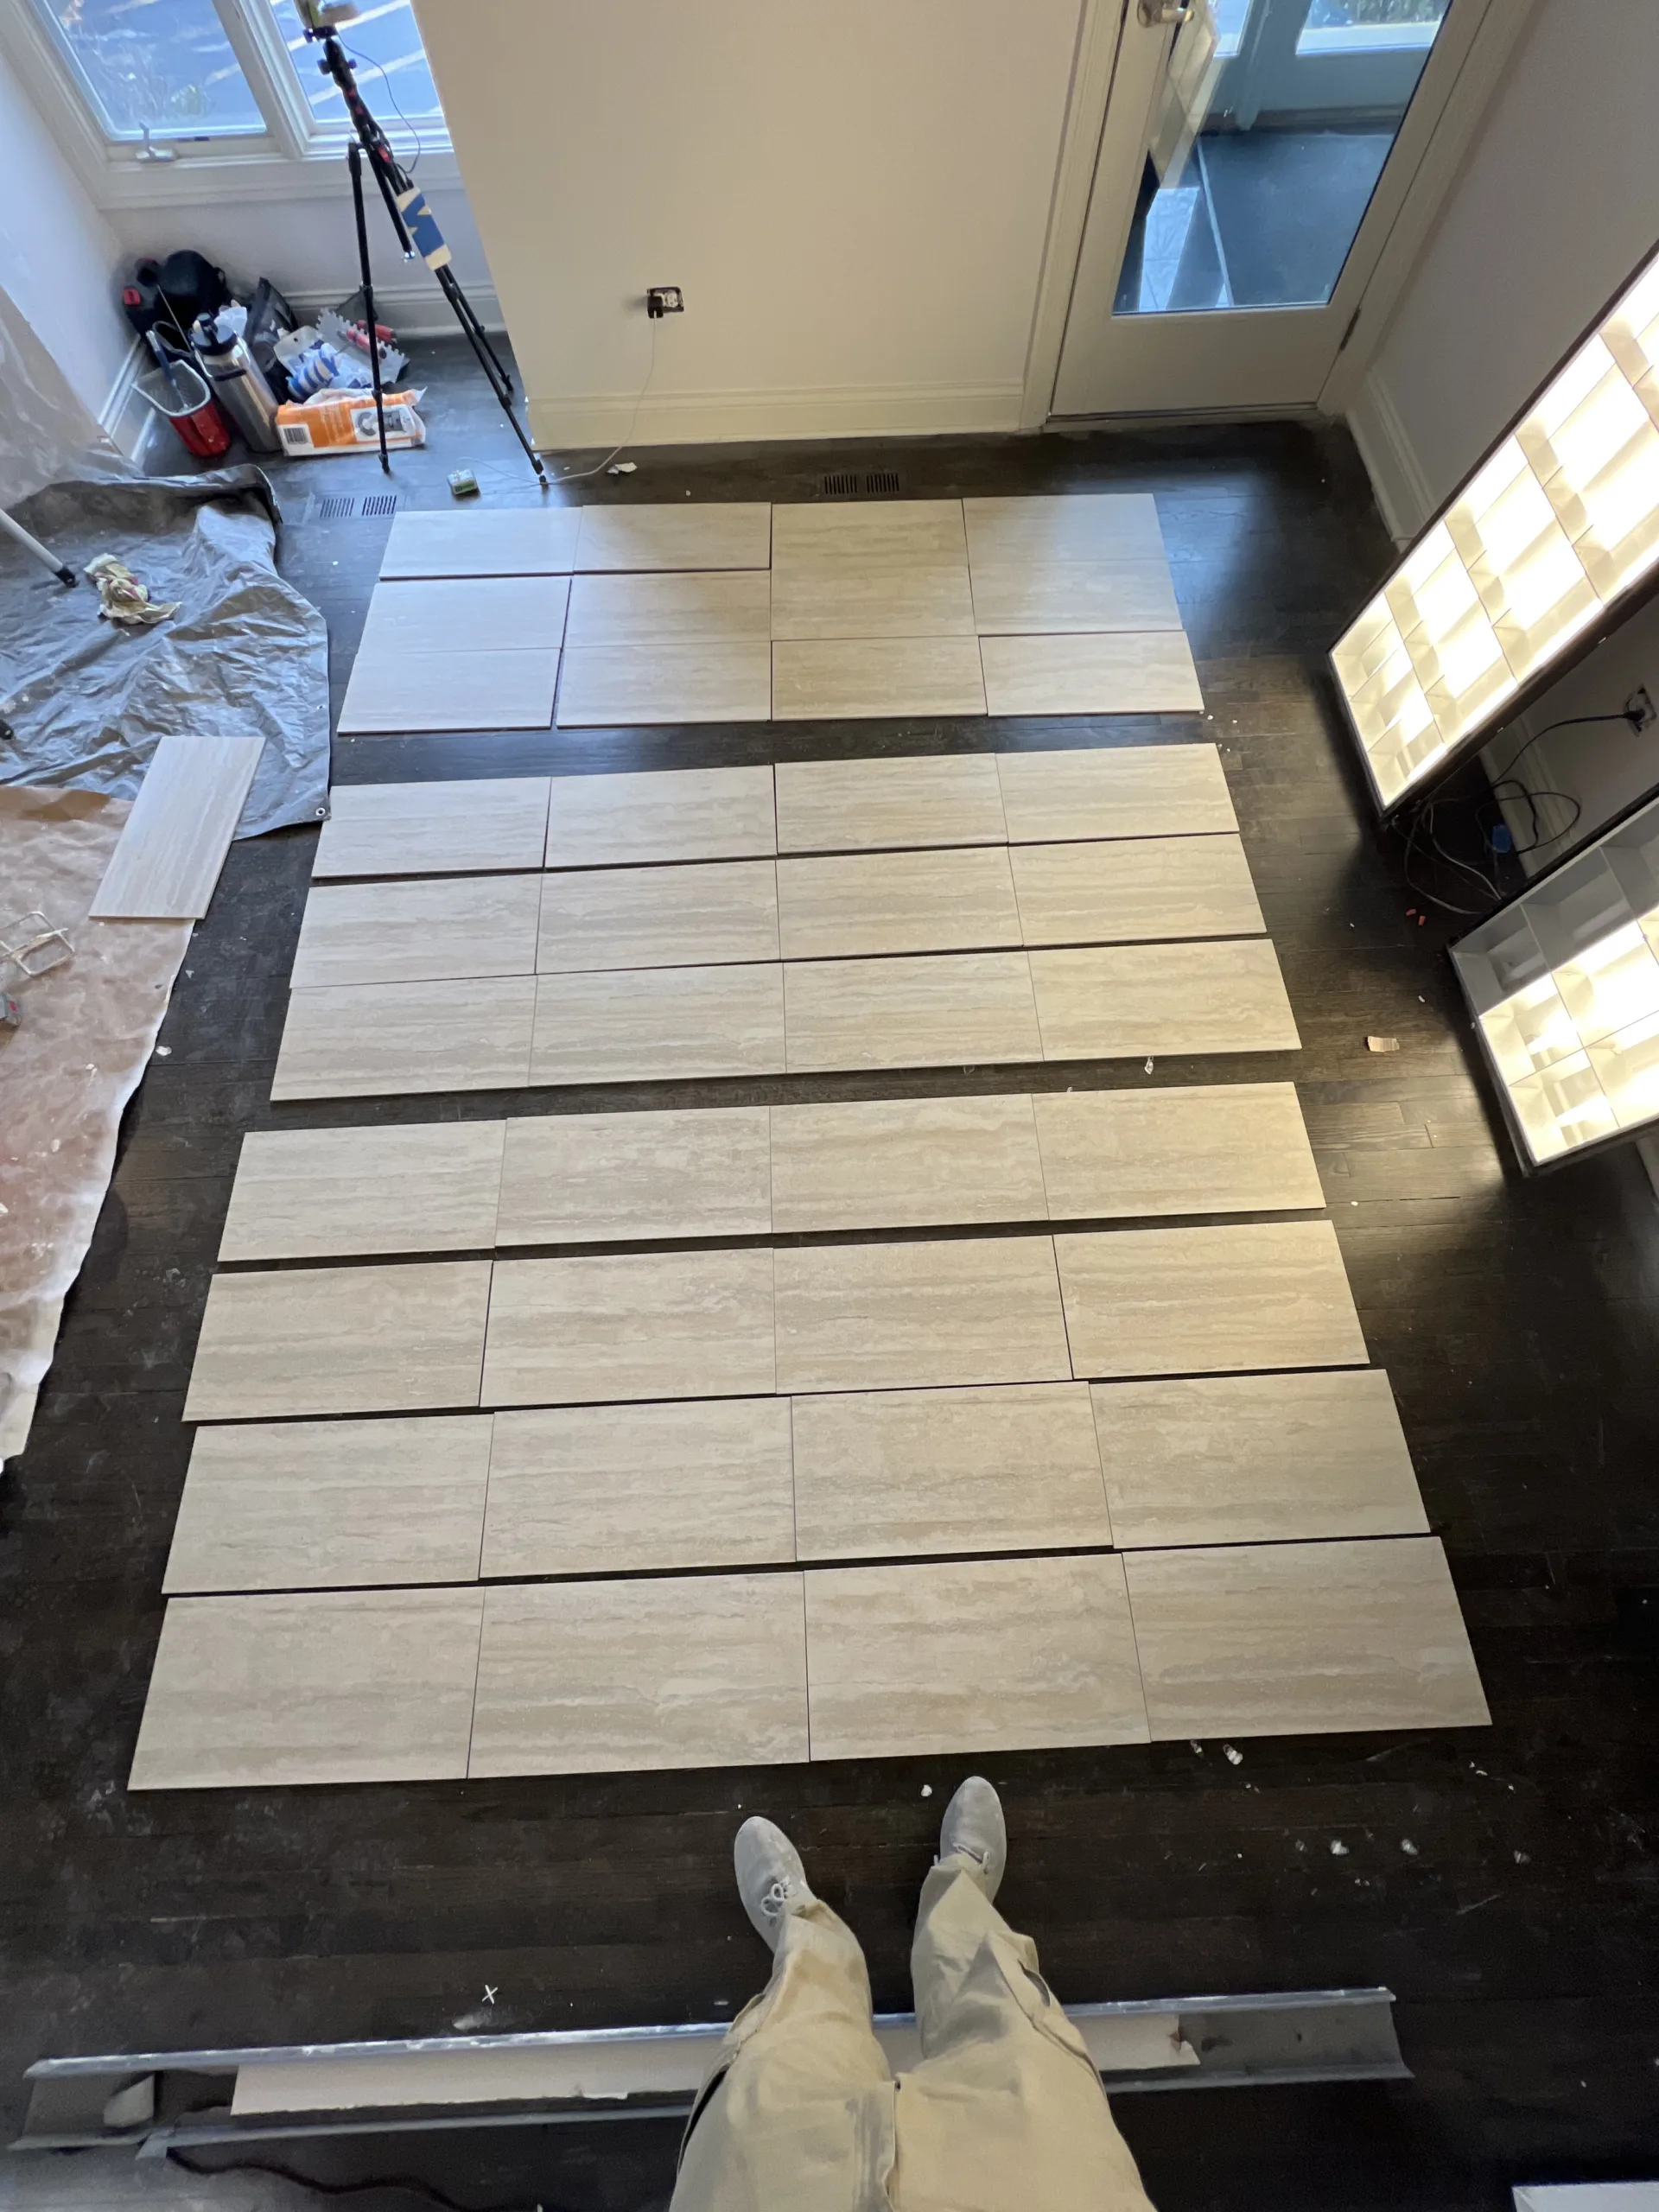
Before installing tile on the wall, the large-format pieces were laid out on the floor. This is a practical step because stone-look tile has movement, tone variation, and directional patterning. Seeing the tiles together before installation helps avoid awkward color grouping or pattern placement on the finished fireplace wall.
Layout planning also helps determine where grout lines will land. On a fireplace wall, grout lines are very visible because the surface is usually centered in the room. The tile layout has to work around the firebox opening, side edges, ceiling line, and existing dark tile frame.
For this project, the goal was a clean rectangular layout with consistent horizontal and vertical grout joints. The lighter tile created a natural stone appearance, while the dark fireplace opening remained as a strong contrast in the center.
Step 4: Starting the Tile Installation Around the Fireplace
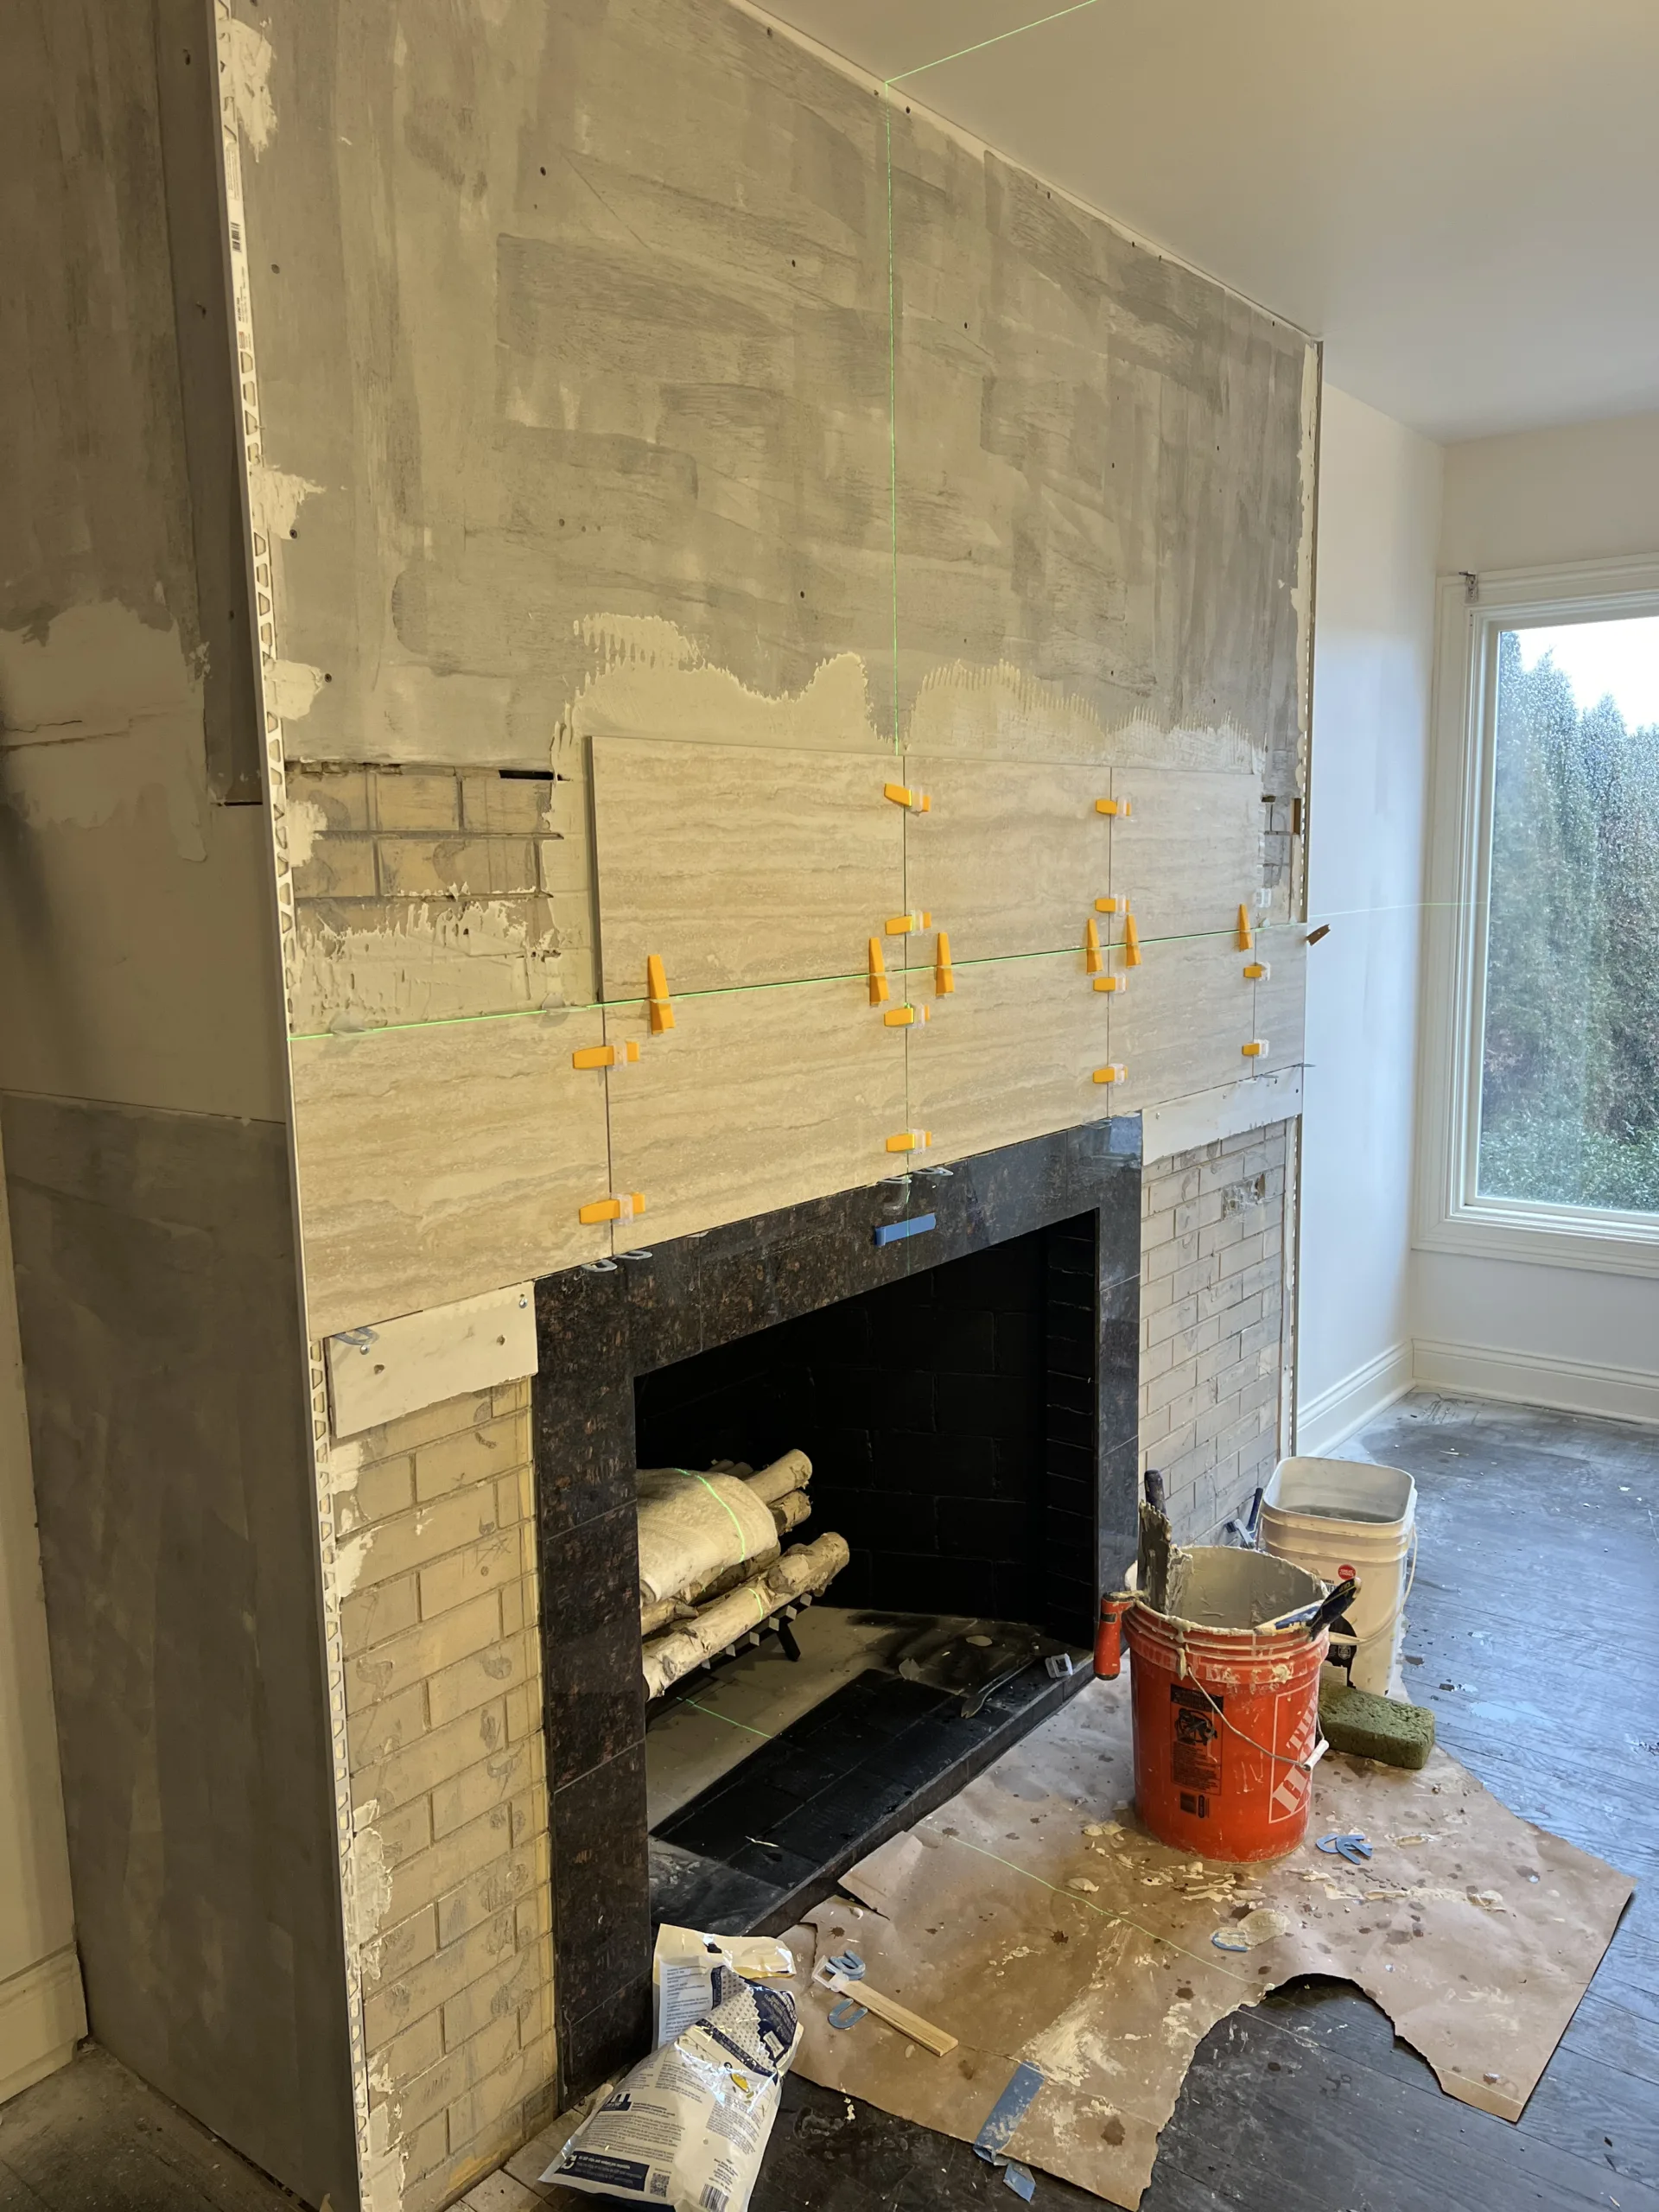
The tile installation started around the fireplace opening and continued upward. A laser level was used to help keep the tile lines straight across the wall. This is especially important with large-format tile because even a small layout error can become obvious as the pattern continues across multiple rows.
The first rows set the direction for the entire fireplace wall. If the first row is not level or the spacing is inconsistent, the problem continues through the rest of the installation. That is why layout lines, spacers, and careful positioning are necessary from the beginning.
The tile had to be installed around the dark existing firebox frame, side returns, and the wall edges. The goal was to create clean transitions and keep the fireplace opening centered visually inside the new tile surround.
Step 5: Setting Large-Format Tile with Leveling Clips
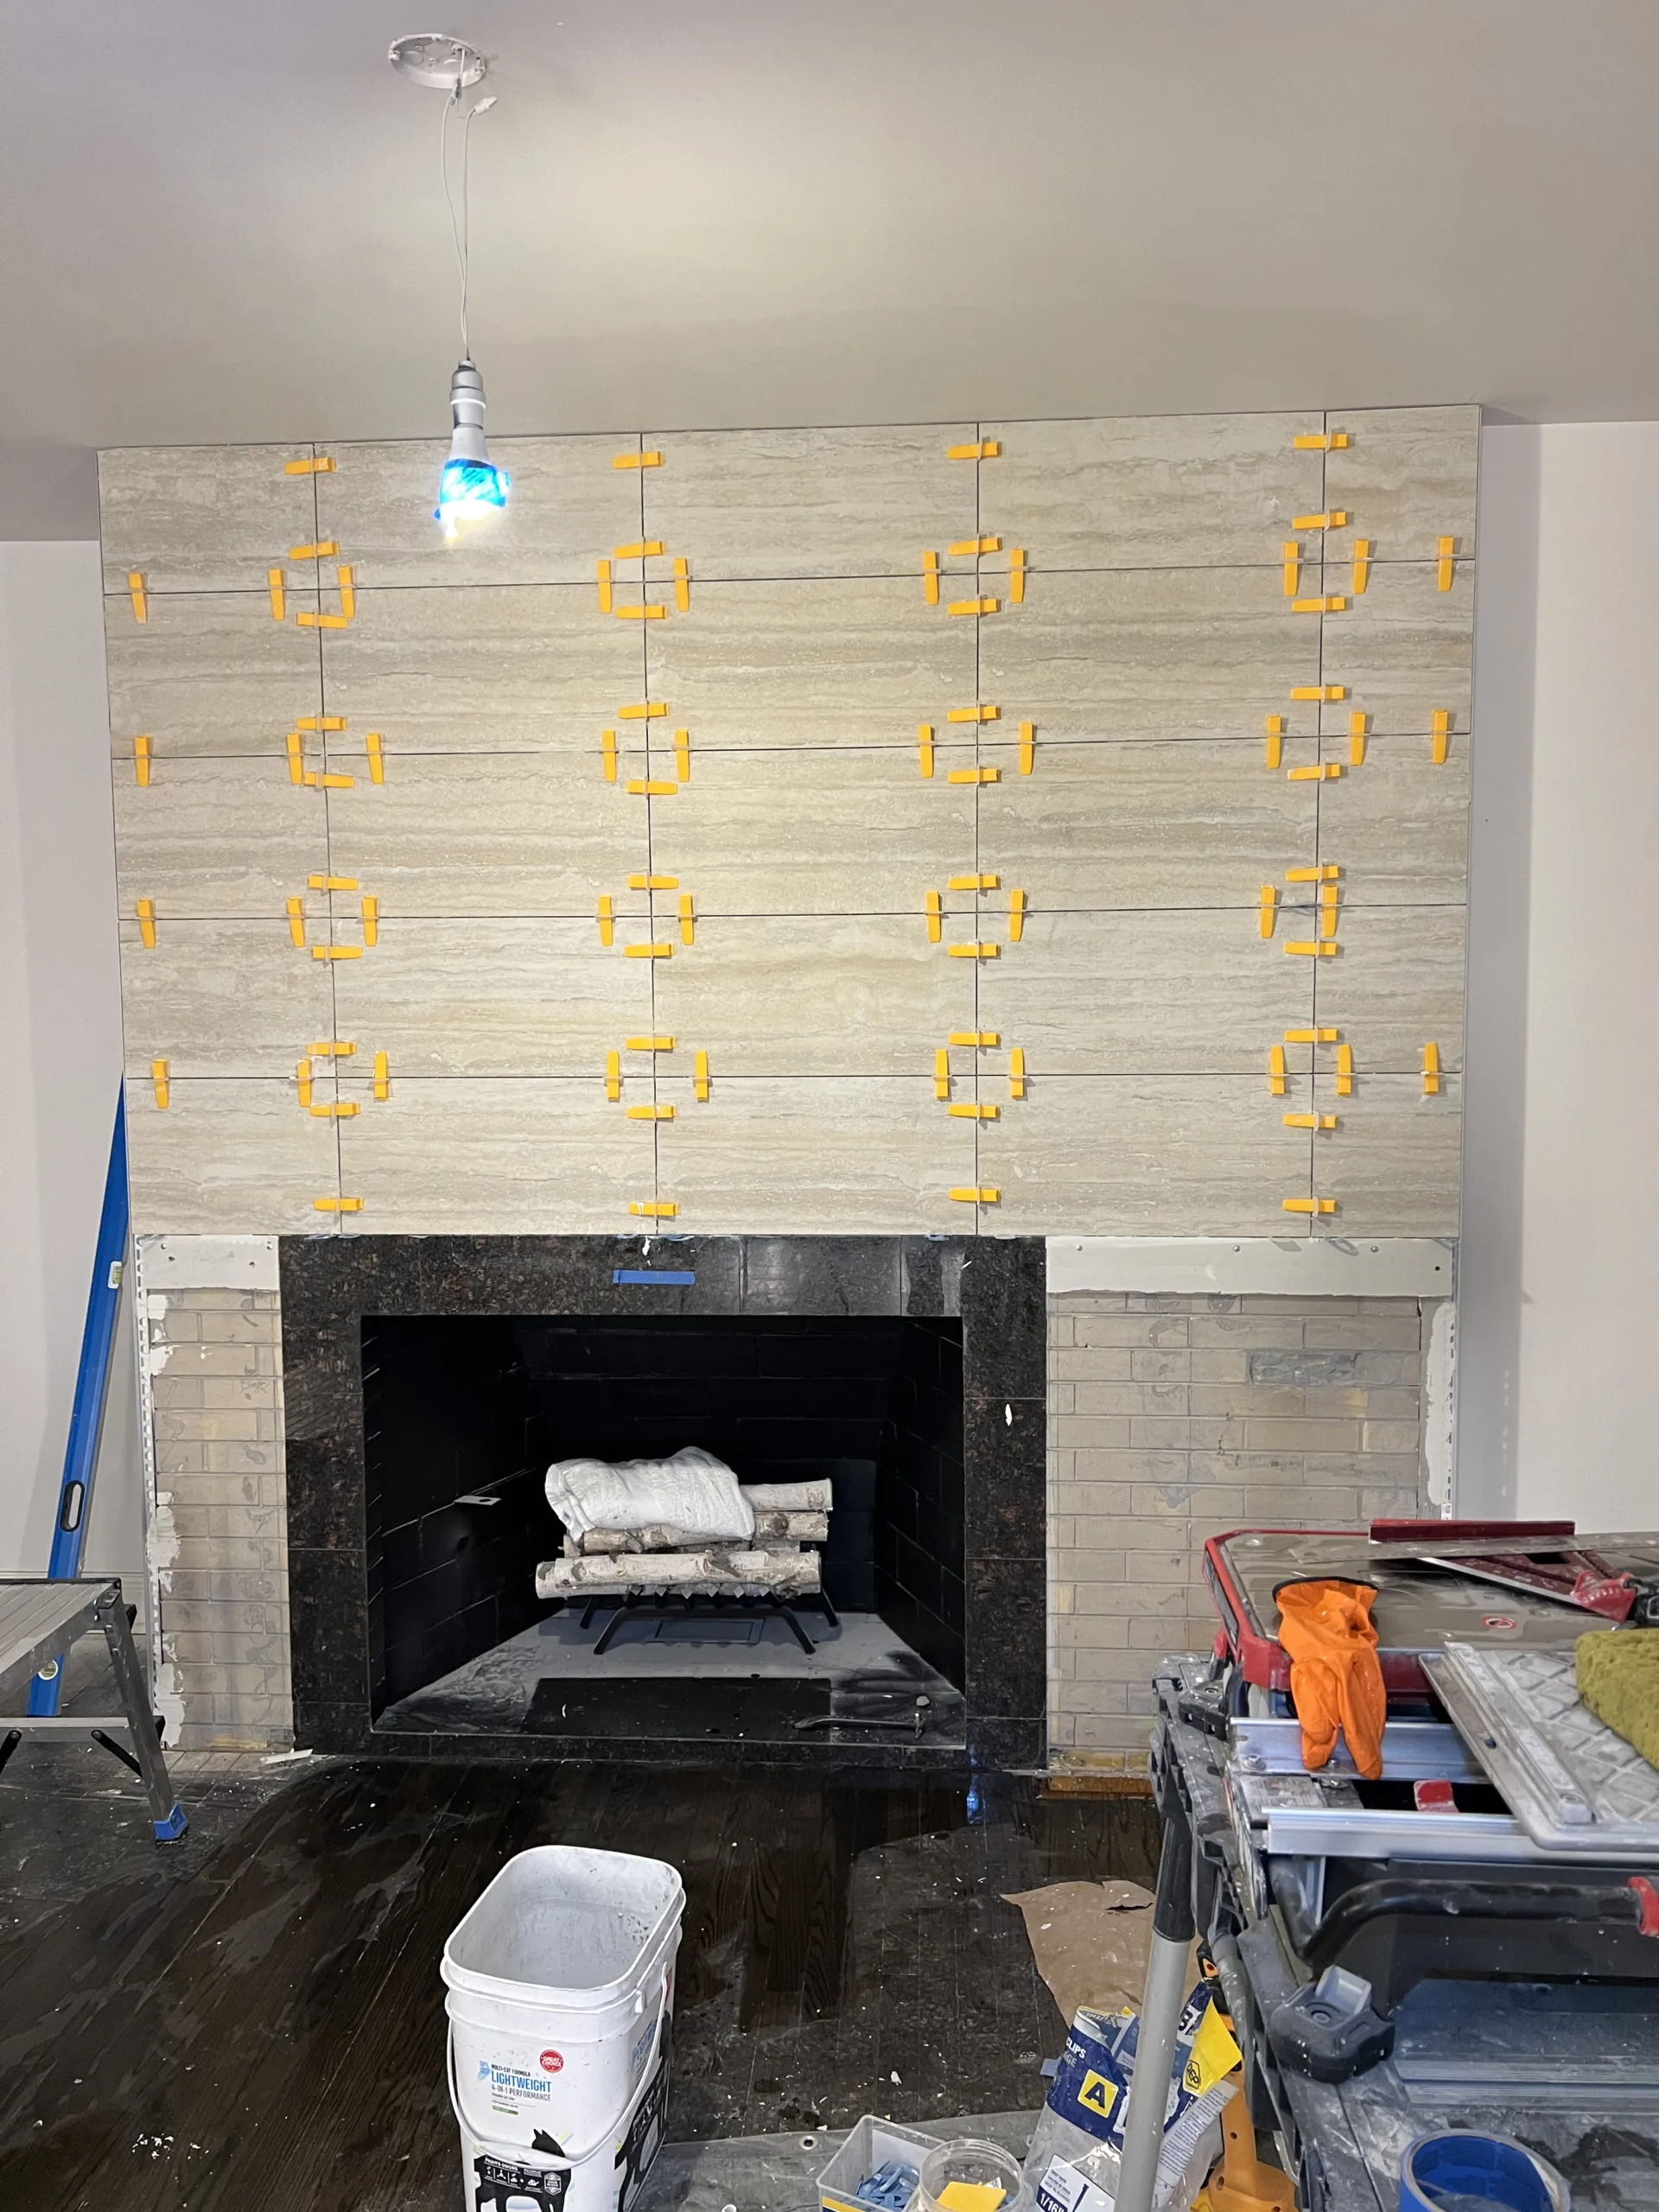
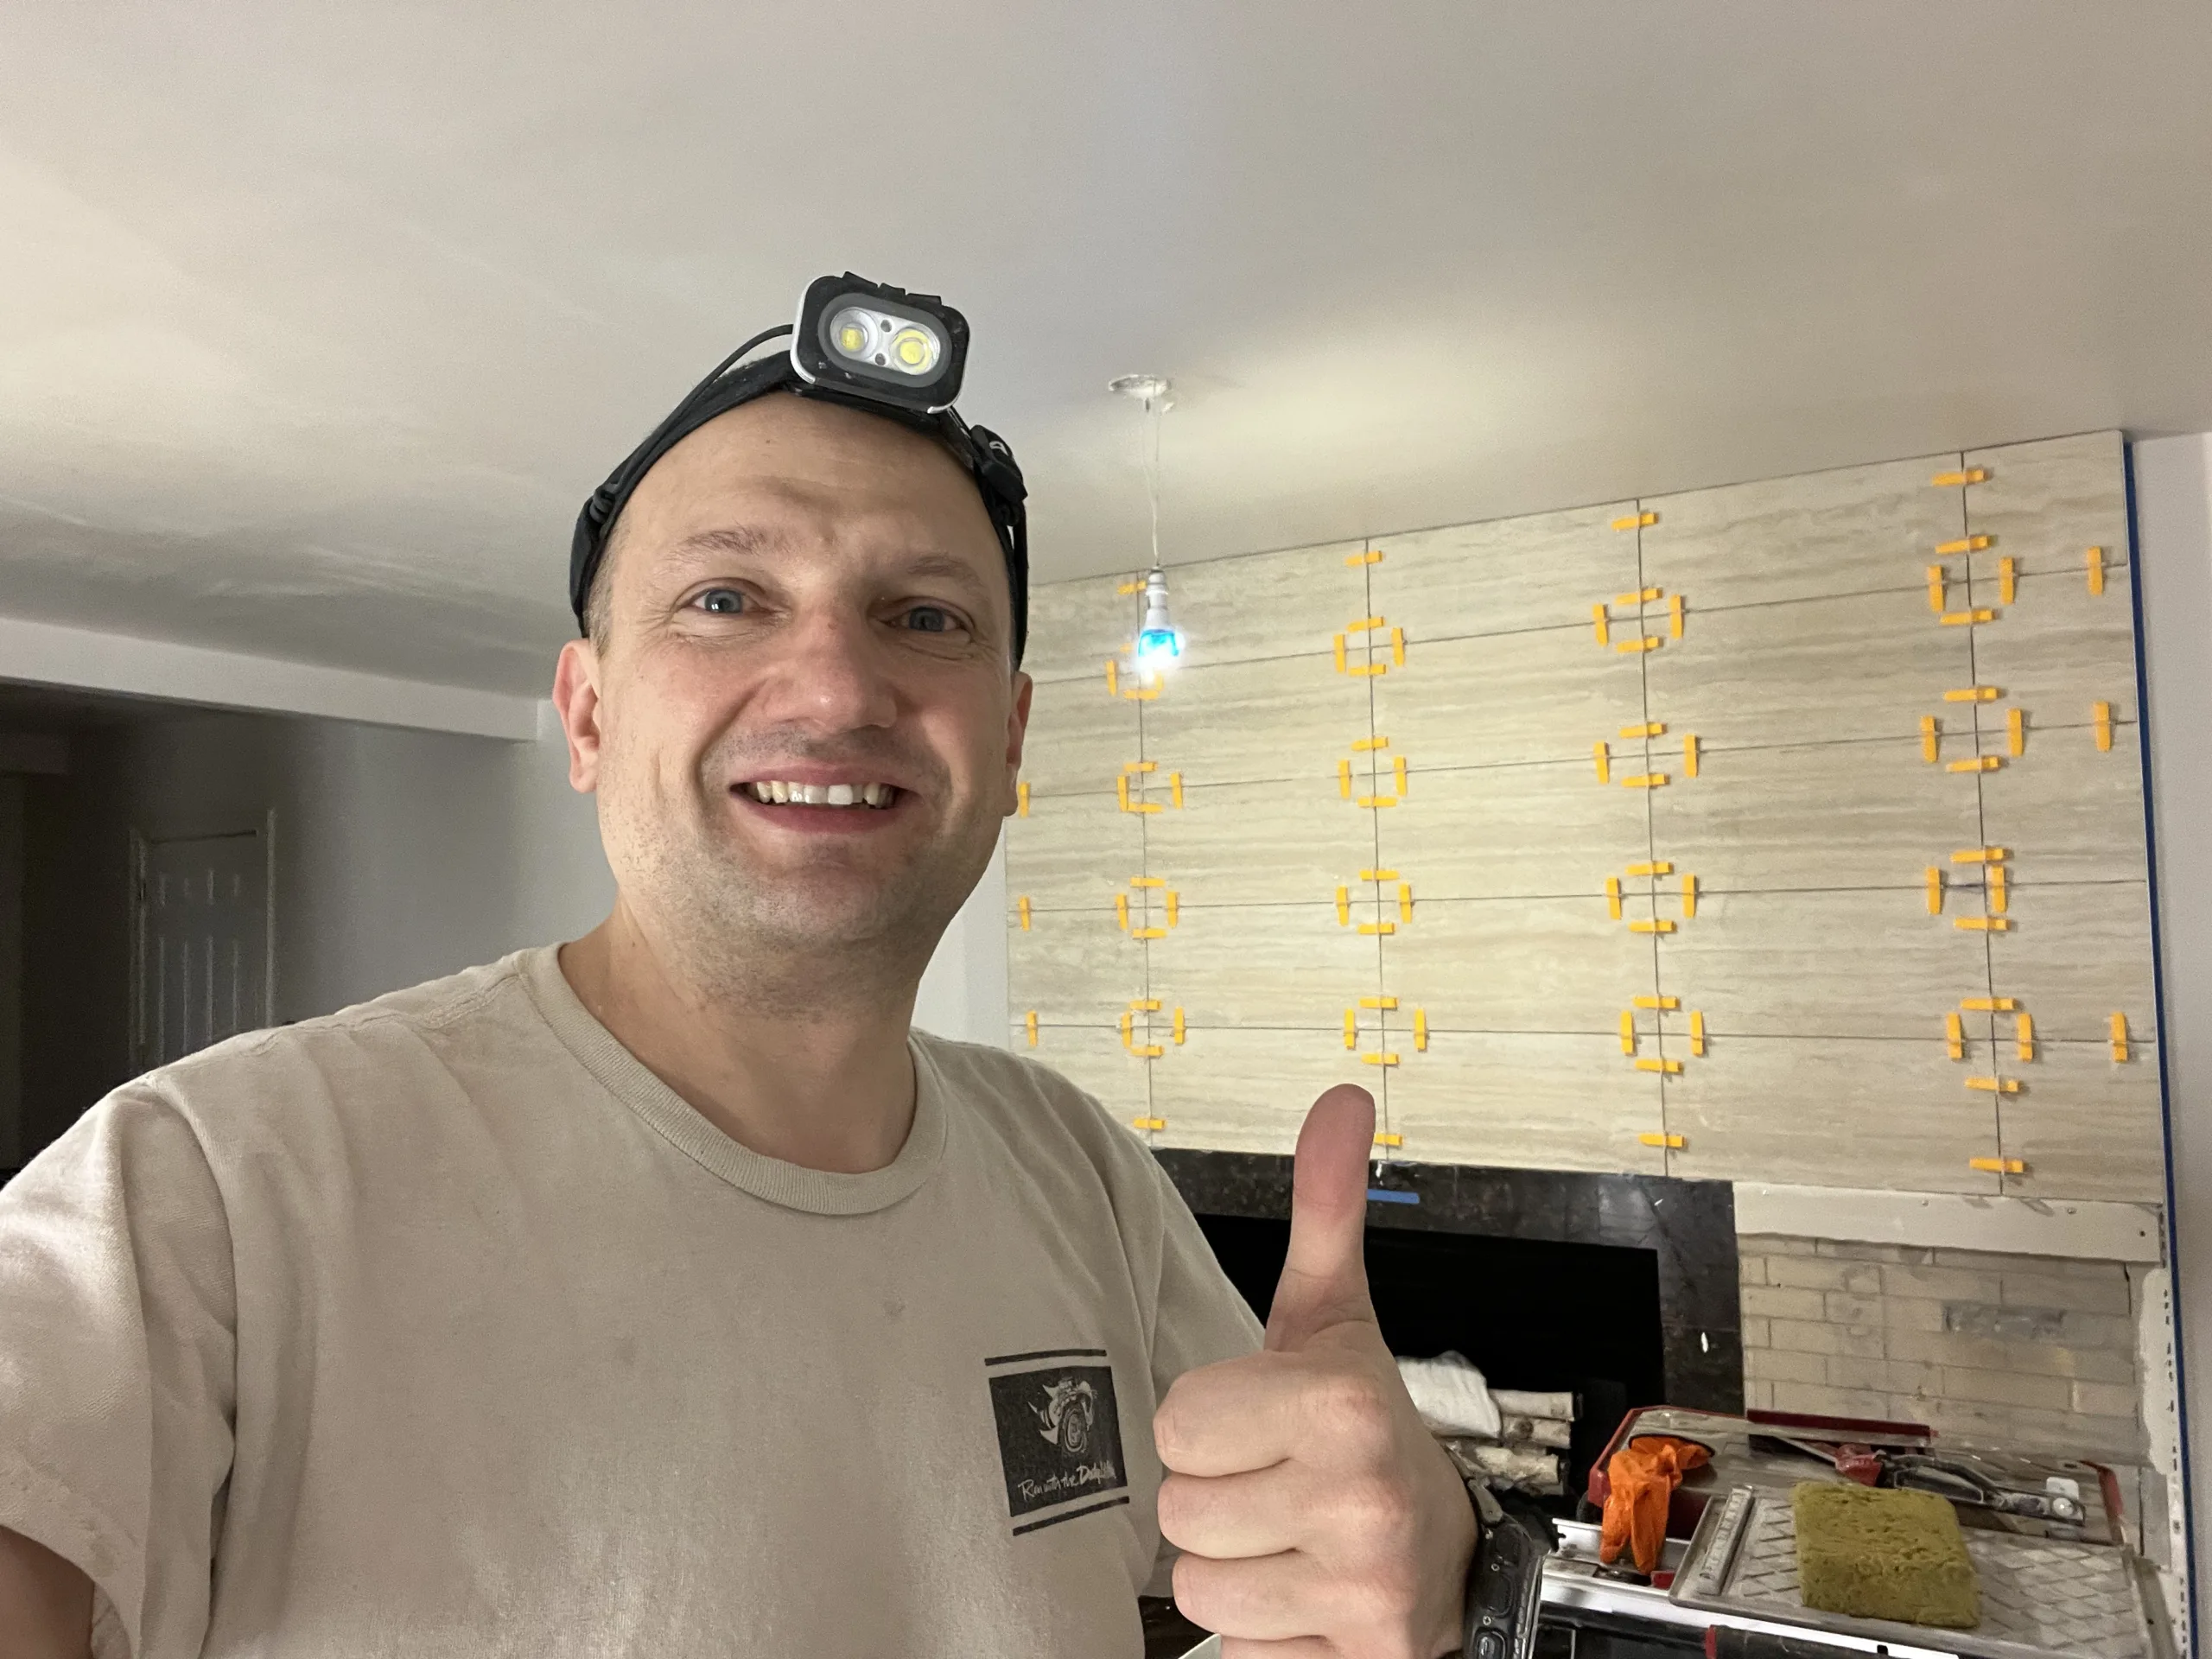
As more tile was installed, leveling clips were used to reduce lippage and keep the tile faces aligned. Large-format tile can be difficult to install on a vertical wall because each tile is heavy, and the surface needs to stay flat from piece to piece.
The leveling clips helped control the joints while the mortar cured. Spacers kept the grout lines consistent, and the laser lines helped maintain straight rows across the full fireplace wall. These details matter because the finished fireplace is a focal point. Any uneven joints, crooked rows, or raised tile edges would be easy to see.
The installation also required careful work around the sides of the fireplace wall. The tile needed to continue cleanly around the face and side returns so the finished surround would look like a complete built-in feature rather than tile simply placed on the front surface.
Step 6: Progress Check Before Grout and Final Cleanup
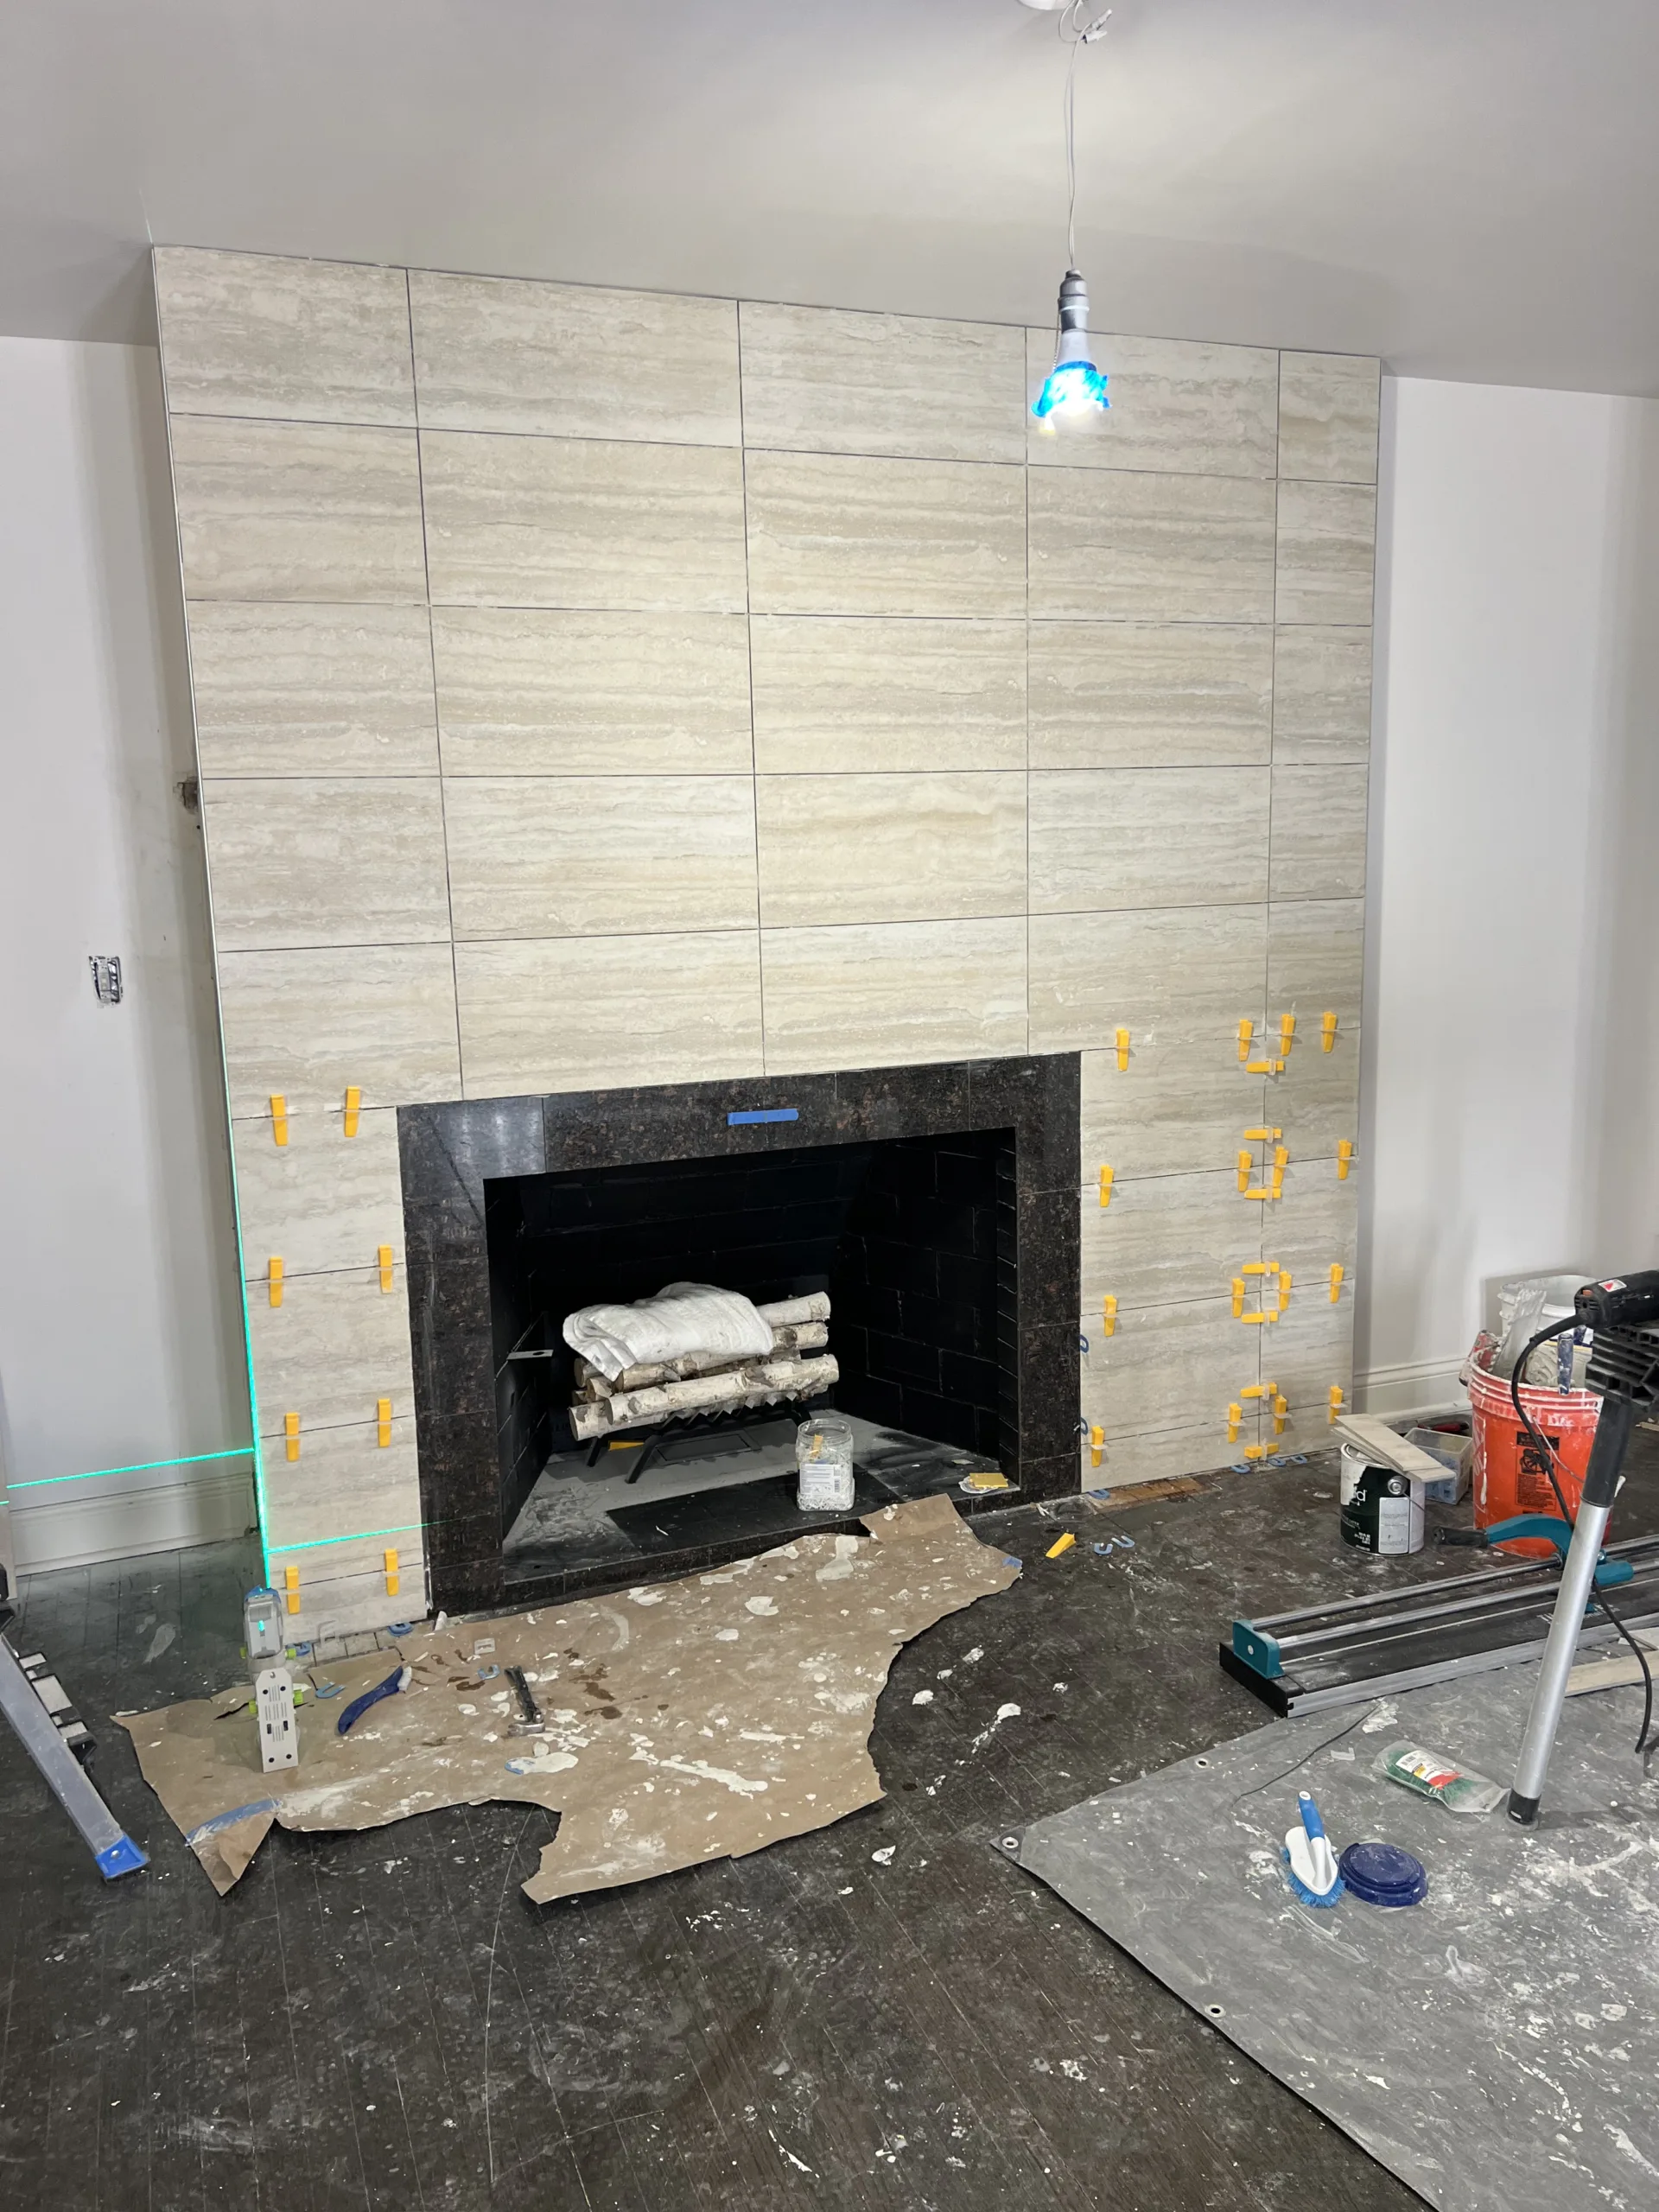
Before grout and final cleanup, the tile installation was checked for alignment, spacing, and overall appearance. This stage is important because it is easier to correct small issues before the final finish is complete.
The fireplace wall had a clean grid pattern, consistent tile joints, and a full-height tile layout. The light stone-look tile gave the wall a softer, more modern appearance, while the dark firebox surround added contrast and definition.
The project still had construction dust, tools, clips, and unfinished details at this stage, but the final design was already visible. The old heavy mantel was gone, and the fireplace had become a much cleaner architectural feature in the room.
Finished Fireplace Remodel with Full-Height Tile
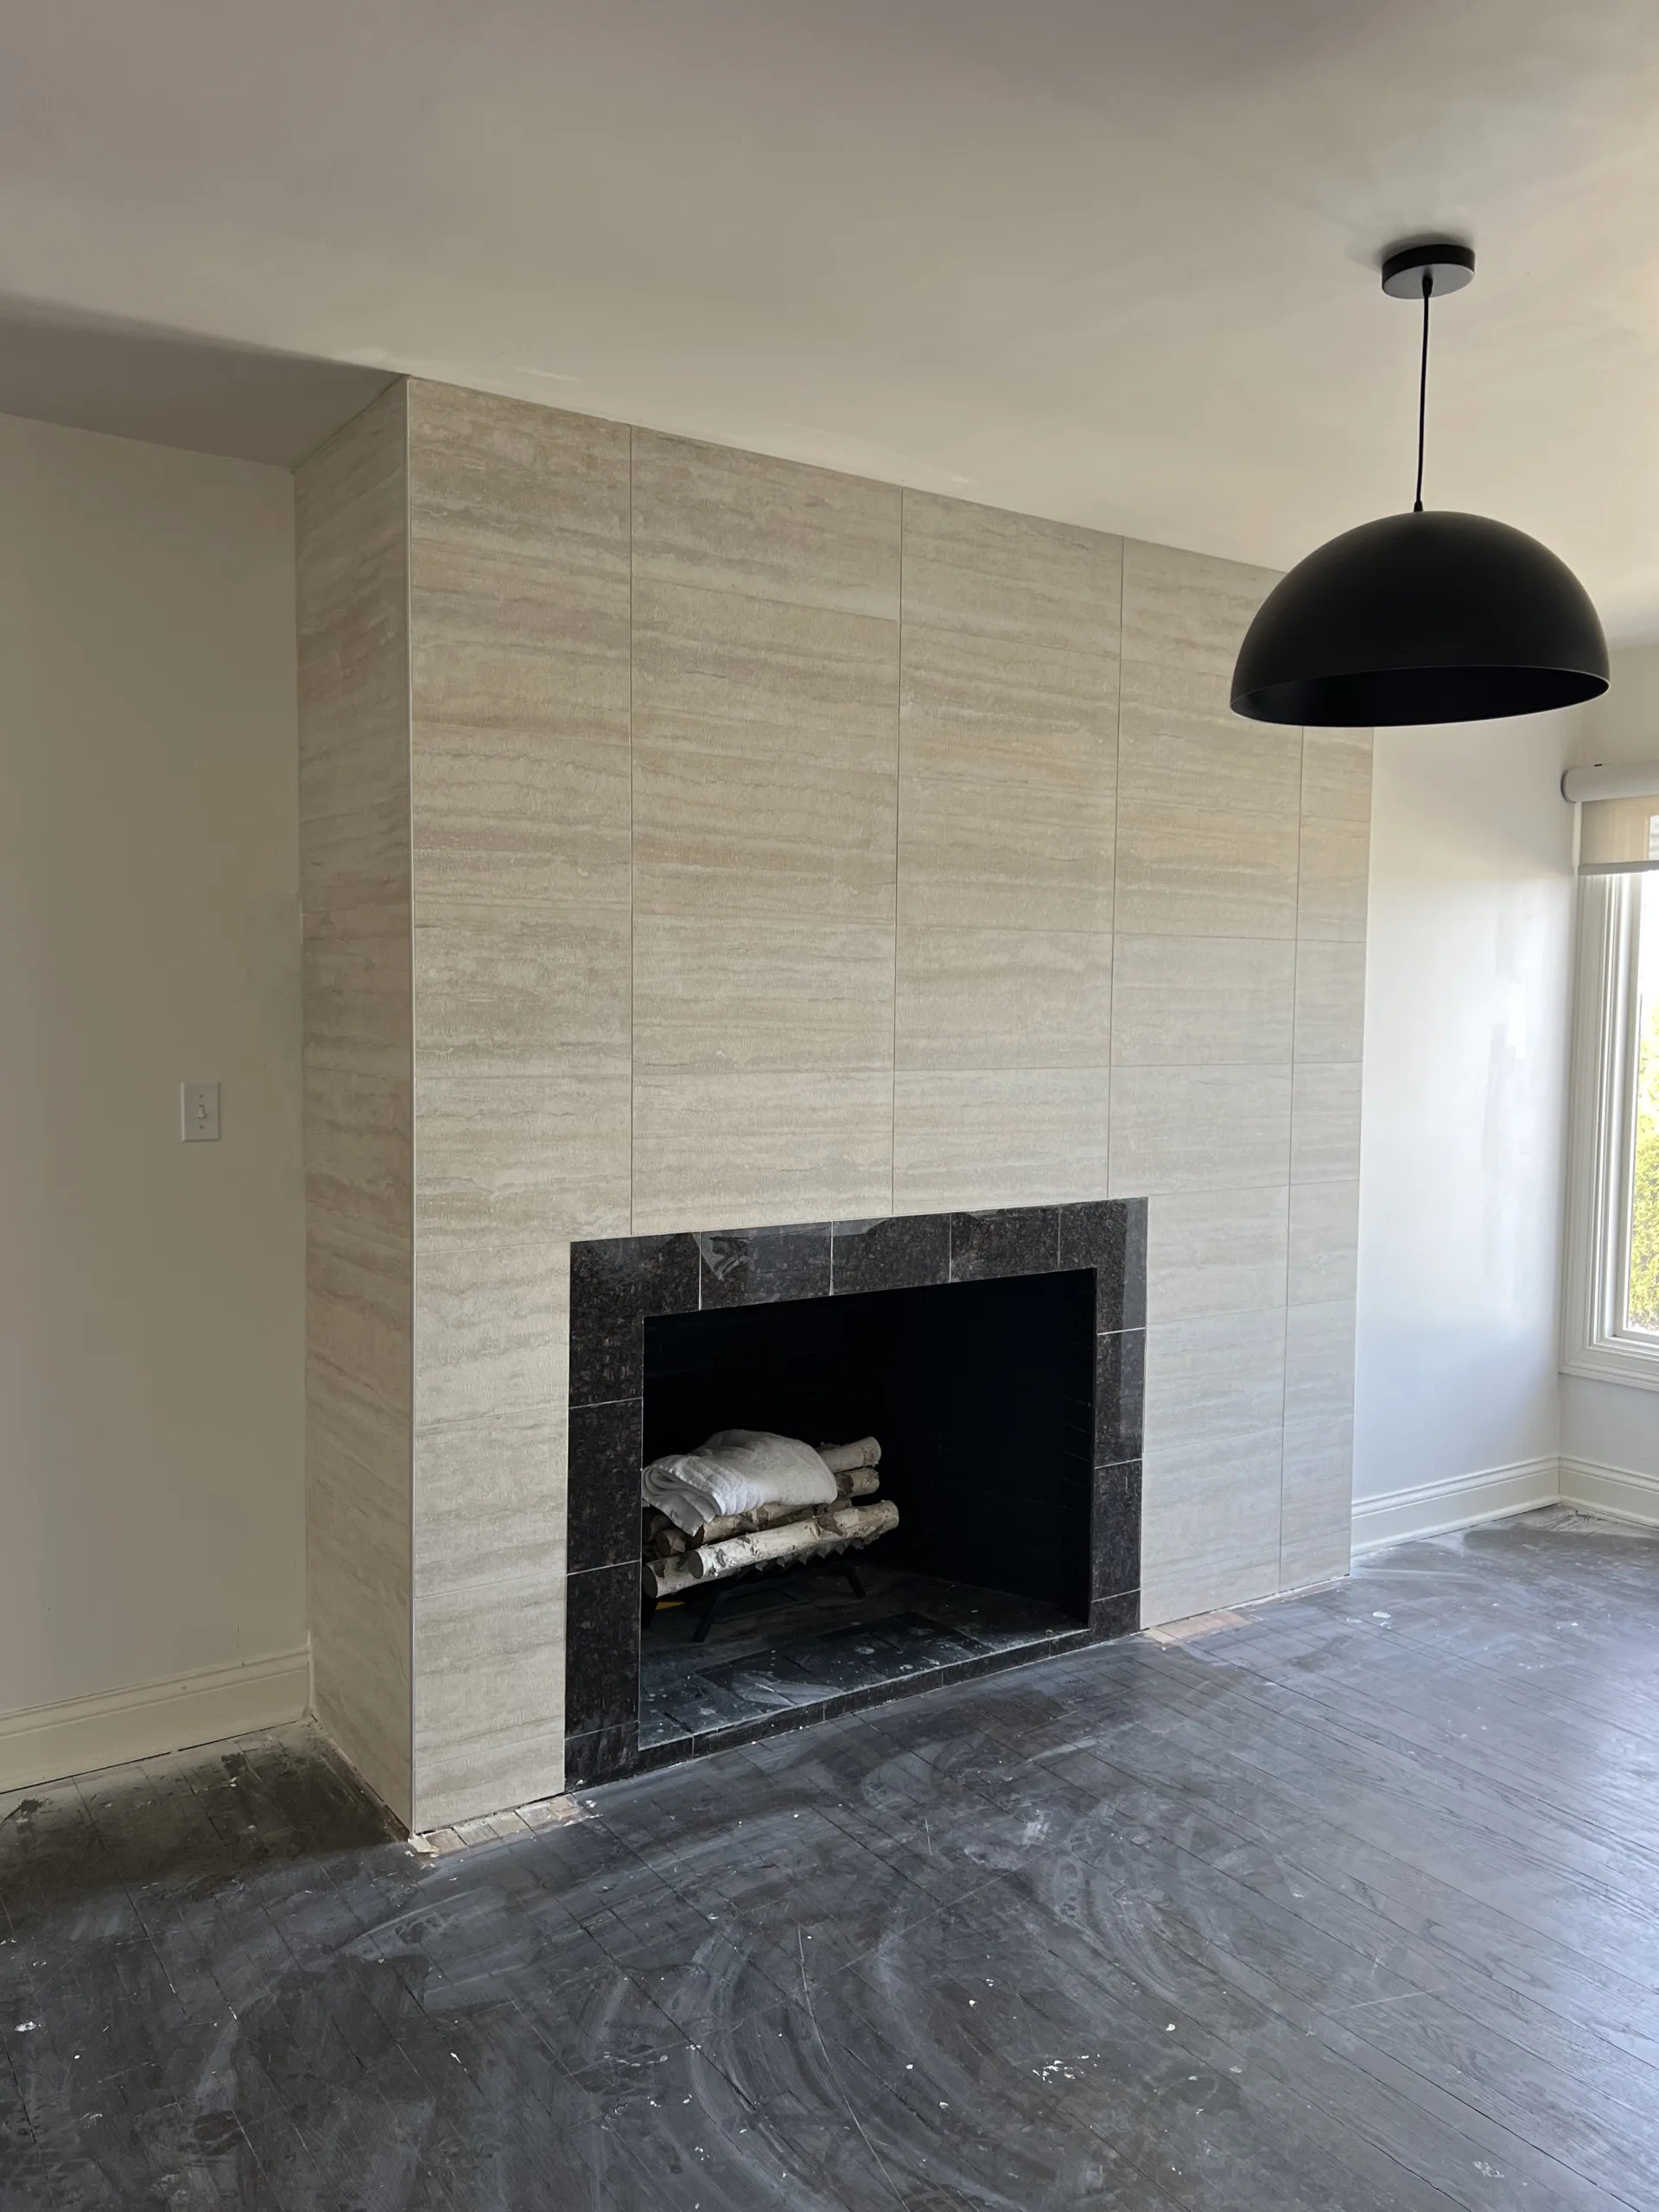
The finished fireplace looks cleaner, taller, and more modern. The large-format tile created a full-height feature wall, replacing the older mantel-heavy look with a simple stone-style surface. The dark tile around the firebox remained as a strong frame, while the lighter tile above and around it brightened the room.
This type of fireplace remodel works well when a homeowner wants a modern update without completely changing the room layout. The fireplace remains in the same location, but the surrounding surface changes the entire feel of the living room.
The final result is a balanced design: light stone-look tile, clean grout lines, a dark firebox frame, simple wall edges, and a more modern fireplace presence. Instead of looking like an older decorative insert, the fireplace now feels integrated into the room.
Why Large-Format Tile Works Well for Fireplace Remodeling
Large-format tile is a strong choice for a fireplace remodel because it creates a cleaner surface with fewer grout lines. On a tall fireplace wall, smaller tiles can sometimes make the surface feel busy. Larger tiles give the wall a more continuous stone-like appearance.
Large-format tile also works well when the goal is to make the fireplace feel more modern. The clean rectangular layout, light neutral color, and subtle stone pattern can update the room without making the fireplace too decorative or heavy.
For this project, the tile helped solve several design problems at once. It covered the old wall and brick surface, removed the need for a large mantel, created a cleaner focal point, and gave the fireplace surround a more current look.
Fireplace Refacing vs. Full Fireplace Replacement
Many fireplaces do not need to be fully replaced to look better. If the main fireplace opening and surrounding structure are serviceable, refacing the surround with tile can make a major visual difference.
A full fireplace replacement may involve changes to the firebox, chimney, gas line, venting, framing, or mechanical components. A fireplace refacing project is more focused. It updates the visible surface around the fireplace while keeping the main fireplace location and layout in place.
This project was a fireplace surround remodel. The main work was removing the old mantel, preparing the wall, and installing new tile. That made it a practical way to modernize the room without rebuilding the entire fireplace system.
Fireplace Tile Installation and Interior Remodeling in Chicago
Evo Service provides fireplace tile installation, fireplace surround remodeling, tile refacing, interior finish work, wall preparation, trim work, drywall repair, and small remodeling services in Chicago and nearby suburbs.
If your fireplace has an outdated mantel, old brick, damaged surround, mismatched tile, or a heavy traditional look that no longer fits your room, a tile fireplace remodel can create a cleaner and more modern focal point.
For homeowners who want a practical update, fireplace refacing can be a good alternative to full replacement. The existing fireplace remains in place, while the visible surround is updated with a new material, cleaner layout, and better finish.
FAQ: Fireplace Tile Remodel in Chicago
Can an old fireplace be remodeled without replacing the whole fireplace?
Yes. If the fireplace structure and firebox are serviceable, the visible surround can often be remodeled with new tile, stone-look tile, trim changes, wall preparation, and finish work without replacing the entire fireplace system.
What was included in this fireplace remodel?
This project included old mantel removal, wall and brick surface preparation, substrate installation, large-format tile layout, tile installation around the fireplace, leveling clips, grout joint alignment, and final cleanup.
Why use large-format tile on a fireplace?
Large-format tile creates a cleaner modern look with fewer grout lines. It works well for full-height fireplace walls because it can make the fireplace look taller, simpler, and more architectural.
Can tile be installed over an old brick fireplace?
In many cases, yes, but the surface must be inspected and prepared correctly. The wall may need cleaning, flattening, substrate installation, patching, or other preparation before tile can be installed properly.
Is fireplace refacing the same as fireplace repair?
No. Fireplace refacing updates the visible surround and finish. Fireplace repair may involve the firebox, chimney, masonry, venting, gas line, or mechanical parts. This project was a tile surround remodel, not chimney or firebox repair.
Do you install fireplace tile in Chicago?
Yes. Evo Service provides fireplace tile installation, fireplace surround remodeling, tile refacing, wall preparation, and interior finish work in Chicago and nearby suburbs.